
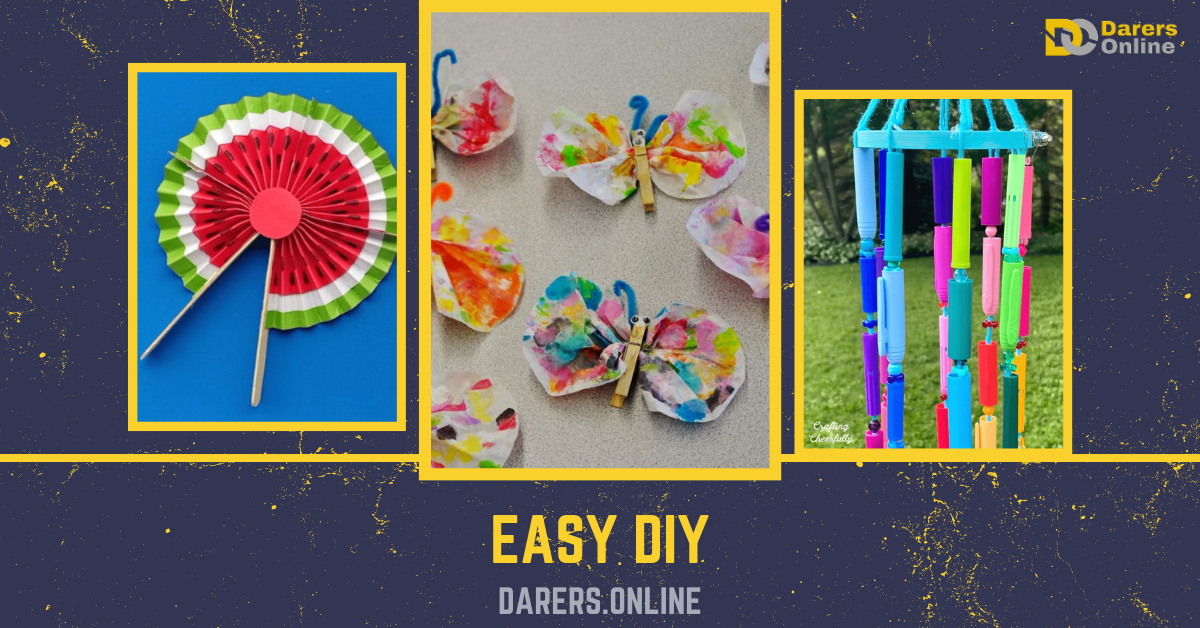
EASY DIY: As the summer break approaches, parents everywhere are on the lookout for activities to keep their kids entertained. Fortunately, we’ve compiled a collection of easy DIY ideas that are sure to captivate their attention. From building backyard forts to crafting colorful slime, there’s something for every young explorer to enjoy. With these projects, you can turn ordinary days into extraordinary adventures, fostering creativity and bonding along the way.
Whether your child is a budding artist or a nature enthusiast, our list has something to offer. Dive into the world of DIY and watch as their excitement grows with each new creation. With just a few simple supplies and a dash of imagination, you can transform lazy summer days into a whirlwind of fun and discovery.
Also, have a Look at, SUMMER DIET PLAN- 10 Food Items That Will Help You Beat the Heat
What are Some Easy Diy Ideas For Summer to Keep Kids Busy and Entertained?
Are you looking for ways to beat the summer boredom blues? Look no further! We’ve rounded up a collection of easy DIY ideas perfect for keeping kids busy and entertained during the sunny months. From backyard scavenger hunts to homemade popsicle recipes, there’s no shortage of fun activities to explore. So grab your sunscreen and prepare for a summer of creativity and adventure!
As the temperature rises, so does the need for creative ways to keep kids entertained. With these simple DIY projects, you can turn ordinary days into unforgettable experiences. From crafting colorful wind chimes to hosting outdoor movie nights, the possibilities are endless. Get ready to make memories that will last a lifetime! “Summer is a time to embrace creativity and adventure with your kids.”
What are the Top 10 Easy Diy Ideas For Kids?
Looking for inspiration for fun DIY projects to keep your kids engaged? We’ve got you covered! Dive into our list of the top 10 easy DIY ideas that are perfect for children of all ages. From simple crafts to outdoor adventures, these activities are sure to spark their creativity and keep them entertained for hours on end. So gather your supplies and get ready to embark on a journey of imagination and discovery!
With a plethora of options to choose from, finding the perfect DIY project for your child has never been easier. From building blanket forts to creating homemade slime, there’s something on our list to suit every interest and skill level. So why wait? Let’s get crafting and make some unforgettable memories together!
10. Diy Pocket Fan- Delightful DIY Activity:
Looking for a fun and easy DIY project for kids? Making a pocket fan is a breeze! To get started, gather some colorful paper, popsicle sticks, glue, and scissors. First, cut the paper into a rectangle, about 8 inches long and 3 inches wide.
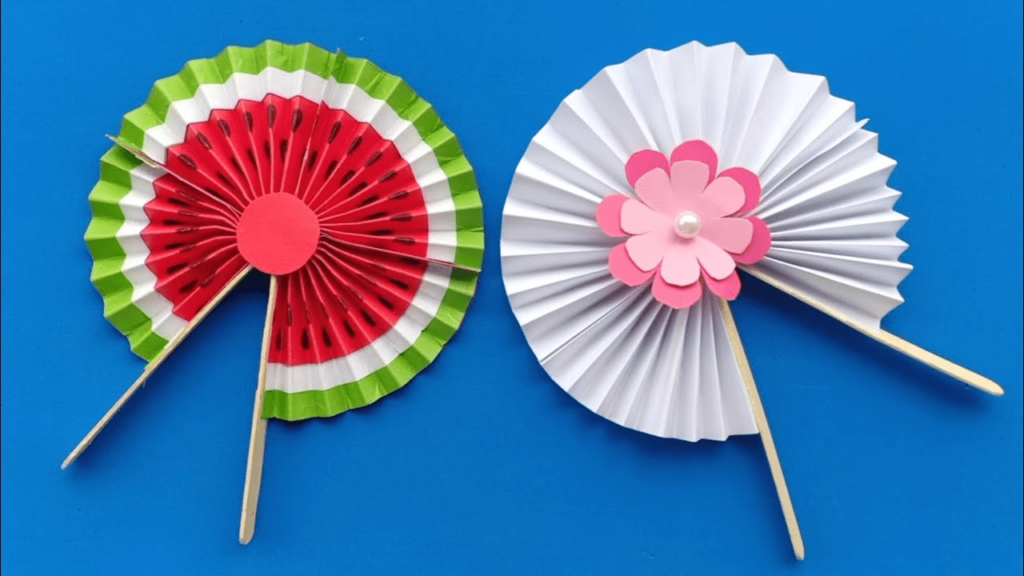
Next, accordion-fold the paper along the long side, making about 1-inch-wide folds. Then, glue one end of the folded paper to a popsicle stick and repeat with the other end. Once the glue dries, your pocket fan is ready to use! With a simple flick of the wrist, kids can enjoy a cool breeze anytime, anywhere. As Albert Einstein once said, “Creativity is contagious, pass it on.” So let your child’s creativity shine with this simple and delightful DIY activity!
9. Ladybug Paper Plate Craft-Complete Pleasure:
Looking for a creative and fun DIY project for kids? Try making a ladybug paper plate! It’s simple and requires just a few materials: a paper plate, red and black paint, googly eyes, glue, and scissors. First, paint the entire paper plate red and let it dry completely.
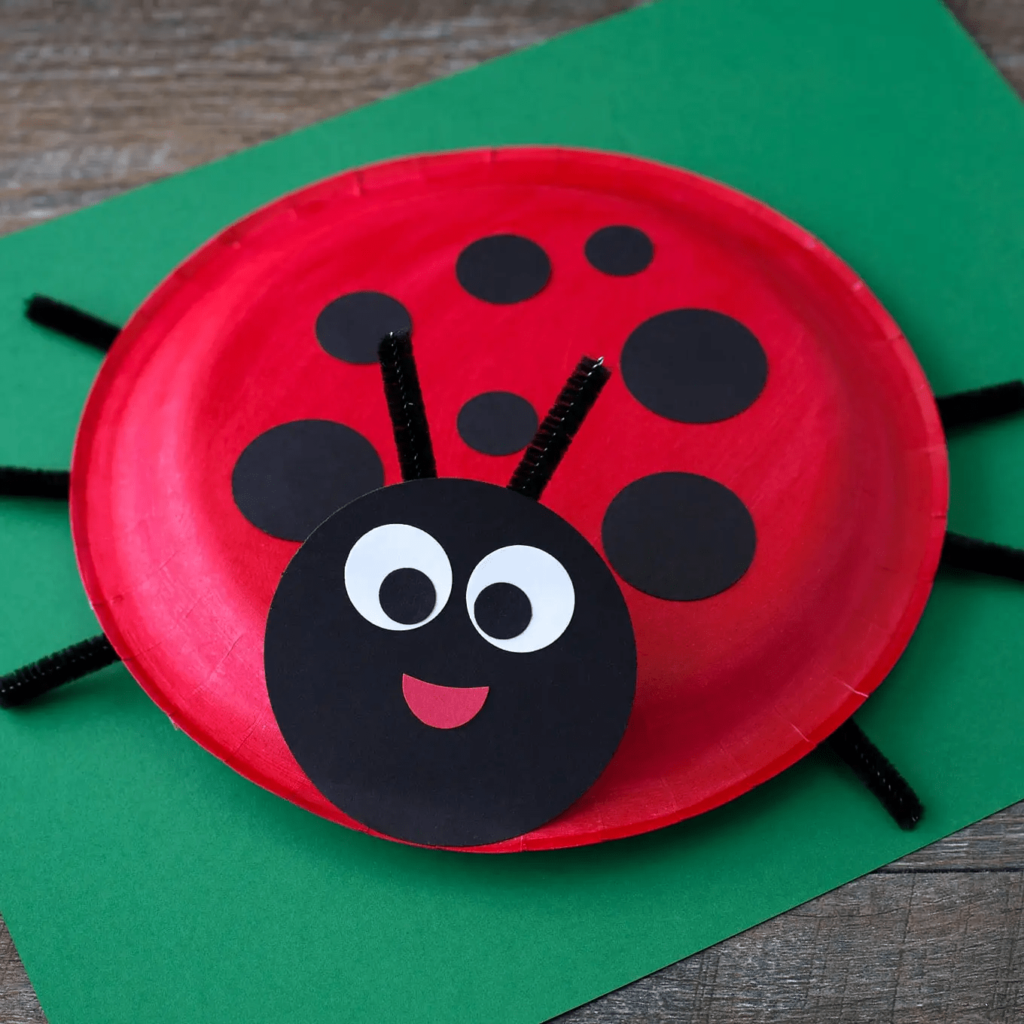
Once dry, paint black spots on the red surface to create the ladybug’s distinctive pattern. Next, glue googly eyes onto the plate and use black paint or a marker to draw a smiley face underneath. Finally, cut black pipe cleaners in half and glue them to the sides of the plate to create the ladybug’s antennae. Your adorable ladybug paper plate is now ready to flutter into action! With this engaging DIY activity, kids can let their creativity blossom while having loads of fun. As Pablo Picasso once said, “Every child is an artist.” So let your child’s imagination soar with this delightful project!
8. Icecream Book Marks-Sweet Activity:
Looking for a sweet and simple DIY project for kids? Why not try making ice cream bookmarks? All you need are some colorful craft foam or construction paper, scissors, glue, and markers. First, cut out ice cream cone shapes from the foam or paper, making sure they’re large enough to function as bookmarks. Next, decorate the ice cream cones with markers to create swirls, sprinkles, and any other toppings your child desires.
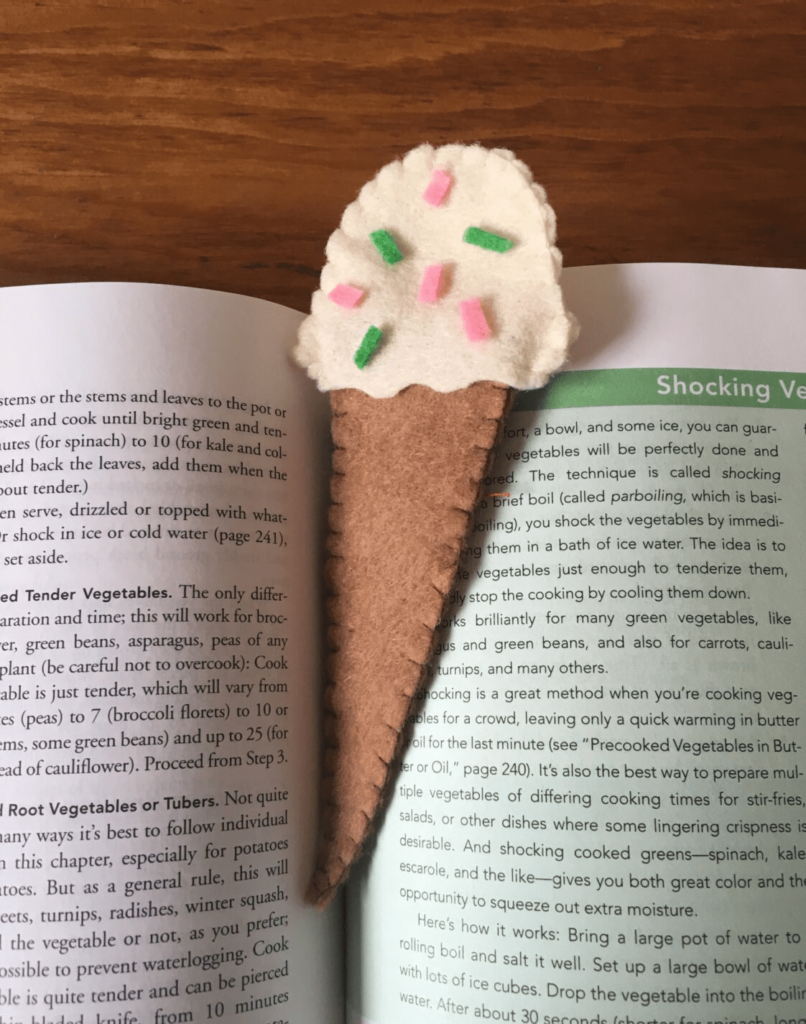
Then, cut out small rectangles from a different color of foam or paper to represent the ice cream scoops. Glue these scoops onto the top of each cone to complete the look. Now, your adorable ice cream bookmarks are ready to use, adding a touch of sweetness to every reading session! With this fun and easy DIY activity, kids can indulge their creativity while encouraging a love for reading. As Dr. Seuss famously said, “The more that you read, the more things you will know. The more that you learn, the more places you’ll go.” So let your child’s imagination run wild with these delightful ice cream bookmarks!
7. Butterfly With Clothespins-Decorating Butterfly:
Looking for a fun and simple DIY project for kids? Why not create beautiful butterflies using clothespins? All you need are some clothespins, colorful paper or foam, markers, glue, and googly eyes. Start by decorating the clothespins with markers to give them a vibrant look. Next, cut out butterfly wing shapes from the paper or foam and decorate them with patterns and colors of your choice. Once the wings are ready, attach them to the clothespins using glue.
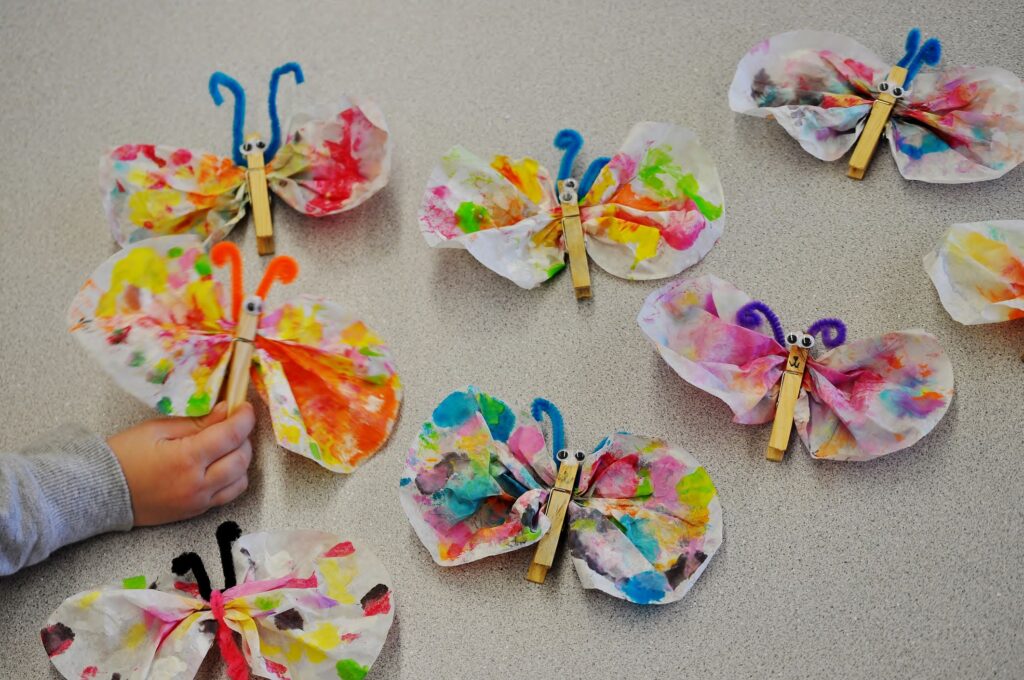
Then, add googly eyes to the top of the clothespins to complete the butterfly’s face. Your lovely clothespin butterflies are now ready to flutter into action, adding a touch of whimsy to any space! As Roald Dahl once said, “Those who don’t believe in magic will never find it.” So let your child’s imagination soar as they create their enchanting butterflies with clothespins!
6. Strawberry Painted Rocks- Resembling DIY Activity:
Try painting rocks to resemble strawberries! All you need are some smooth rocks, red and green acrylic paint, paintbrushes, and a clear sealant spray. Begin by thoroughly cleaning and drying the rocks to ensure the paint adheres well. Next, paint the rocks with red acrylic paint to create the base color of the strawberries. Allow the paint to dry completely before adding details. Then, use green paint to add leafy tops to the rocks, mimicking the appearance of strawberry stems.
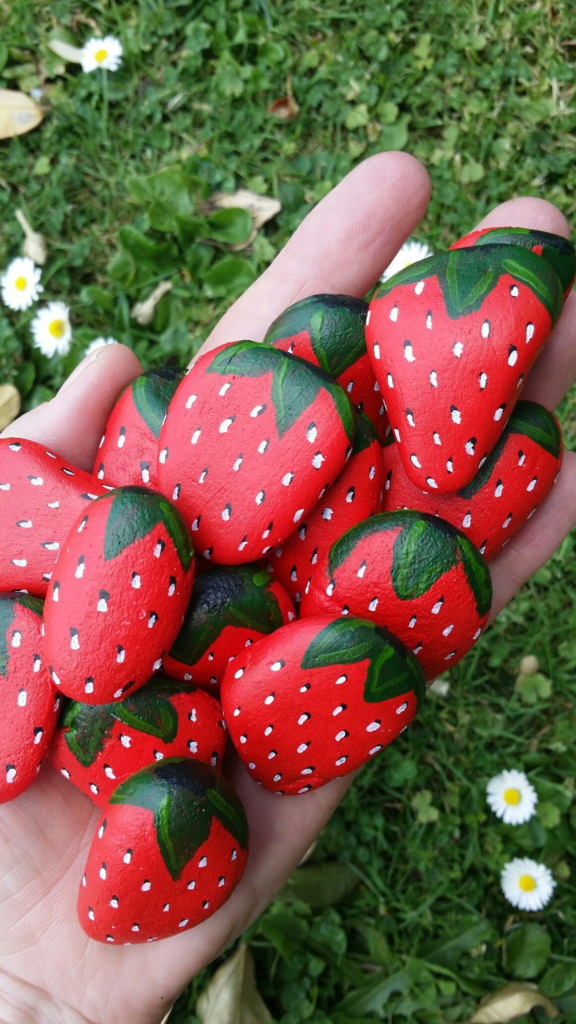
Once the paint has dried, apply a clear sealant spray to protect the paint and give the rocks a glossy finish. Your adorable strawberry-painted rocks are now ready to adorn your garden or be used as decorative pieces indoors! As Vincent Van Gogh once said, “Great things are not done by impulse but by a series of small things brought together.” So let your child’s imagination flourish as they transform ordinary rocks into delightful strawberries!
5. DIY Kaleidoscope-CaptivatingActivity:
Why not make a kaleidoscope together? This simple yet captivating activity only requires a few materials: a cardboard tube, colorful beads, mirrors, glue, and decorative paper. Begin by cutting the cardboard tube to your desired length, typically around 6 inches. Next, attach small mirrors inside the tube using glue, positioning them to create a triangle shape at one end. Then, fill the tube with colorful beads and sequins, ensuring they are evenly distributed.
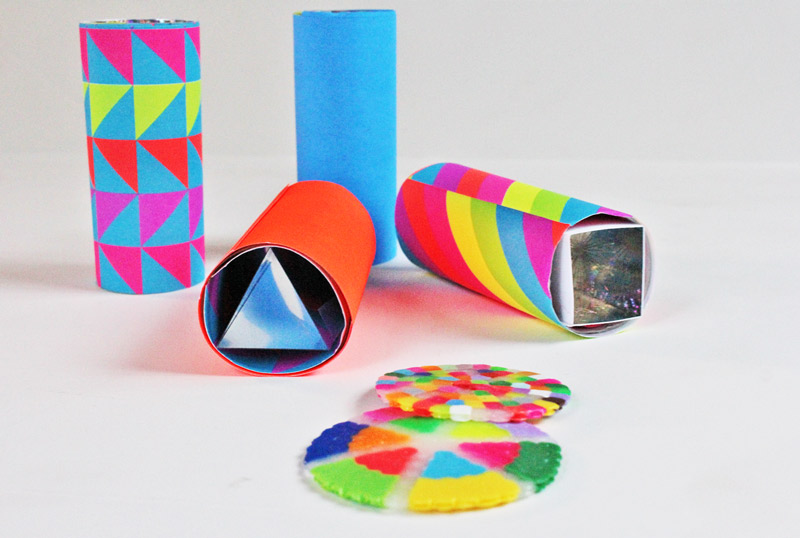
Finally, cover one end of the tube with decorative paper and secure it in place with glue. Your homemade kaleidoscope is now ready to mesmerize with its ever-changing patterns and colors! As Albert Einstein once said, “Imagination is more important than knowledge.” So let your child’s imagination run wild as they peer through their handmade kaleidoscope and discover a world of endless possibilities!
4. Summer Sun with Paper Plates-Enjoyable Diy Activity:
Why not create a summer sun using paper plates? This easy and enjoyable craft requires just a few materials: paper plates, yellow paint, paintbrushes, scissors, and glue. Begin by painting one side of the paper plate with bright yellow paint, covering the entire surface. Next, allow the paint to dry completely before cutting out triangular shapes around the edge of the plate to resemble sun rays.
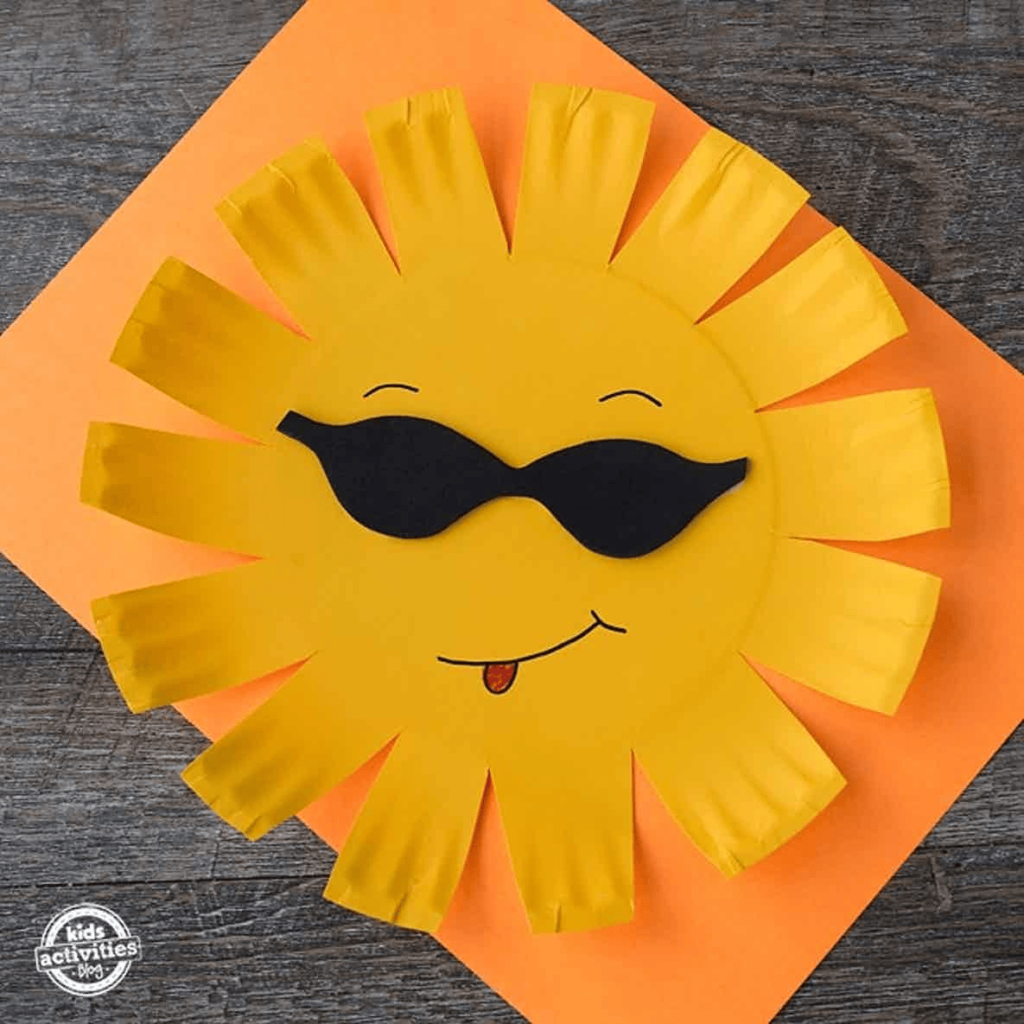
Then, cut out a smaller circle from yellow paper or foam and glue it to the center of the plate to represent the sun’s face. Your cheerful summer sun craft is now ready to shine and spread warmth wherever it goes! As Ralph Waldo Emerson once said, “The sun shines not on us but in us.” So let your child’s inner sunshine radiate as they craft their sunny masterpiece!
3. Diy Wind Chimes- Fun In Summers:
Why not create wind chimes with your kids? This fun and easy activity requires just a few materials: metal or wooden dowels, colorful beads or bells, string or fishing line, and a sturdy base such as a wooden hoop or recycled tin can. Begin by cutting the dowels into different lengths to create varying tones. Next, tie the beads or bells onto the dowels using the string or fishing line, ensuring they are evenly spaced apart. Then, attach the dowels to the base, allowing them to hang freely.
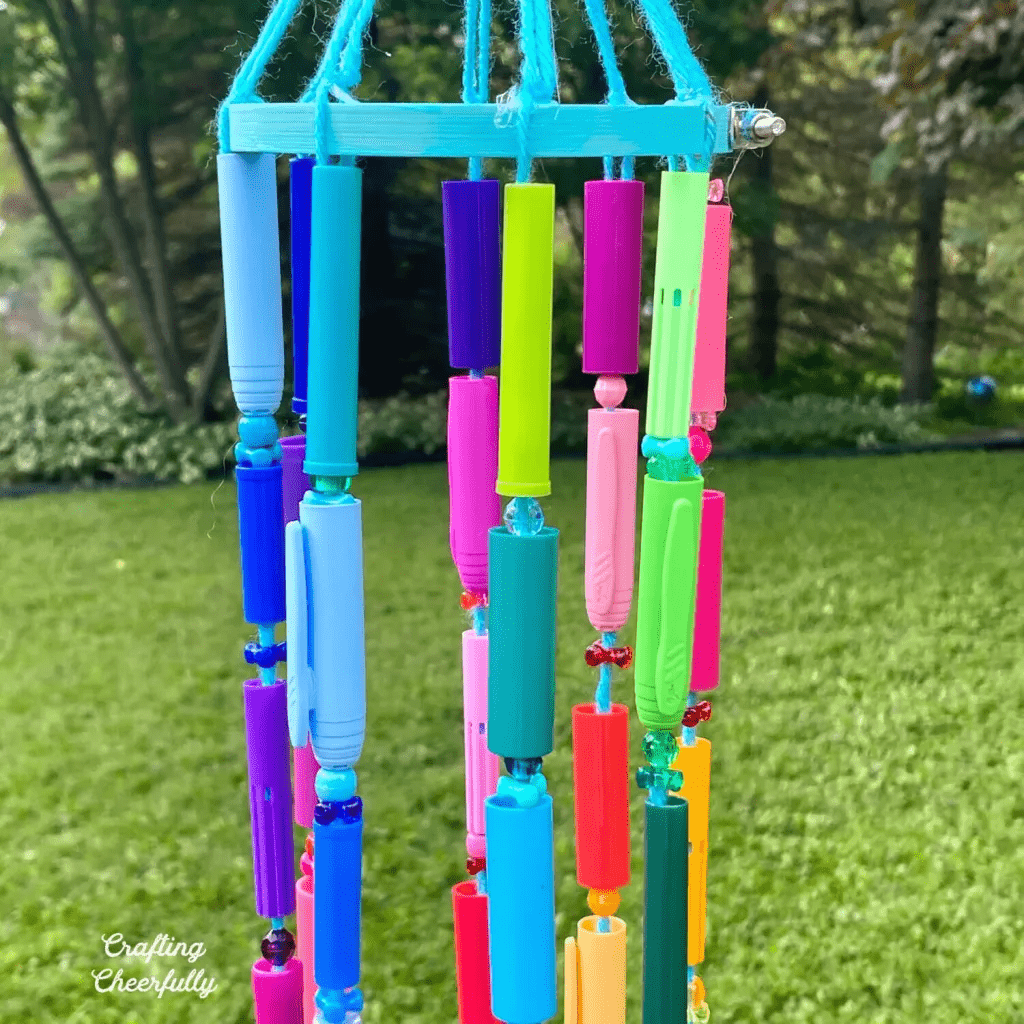
Hang your homemade wind chimes in a sunny spot outdoors and listen as they create soothing melodies with the gentle breeze! As Hans Christian Andersen once said, “Where words fail, music speaks.” So let your child’s creativity sing as they craft their very own musical masterpiece!
2. Diy Sunflower Craft- Engaging DIY Activity:
This easy and engaging activity only requires a few materials: yellow paper plates, brown construction paper, glue, scissors, and markers. Begin by cutting out the center of the paper plate to create the sunflower’s petals. Next, use markers to add details and color to the petals, such as lines or dots.

Then, cut out a circle from the brown construction paper to represent the sunflower’s center and glue it onto the middle of the paper plate. Your vibrant sunflower craft is now ready to brighten up any space and bring a touch of summer indoors! As Vincent van Gogh once said, “I dream of painting and then I paint my dream.” So let your child’s imagination bloom as they craft their beautiful sunflowers!
1. Diy Floating Spoon Flowers-Simple and Charming Activity:
Try making floating spoon flowers! This simple and charming activity requires just a few materials: plastic spoons, colorful paint, paintbrushes, floral foam, and a shallow container filled with water. Begin by painting the convex side of the spoons with vibrant colors to resemble flower petals. Next, allow the paint to dry completely before arranging the spoons in the floral foam to create the illusion of blooming flowers.
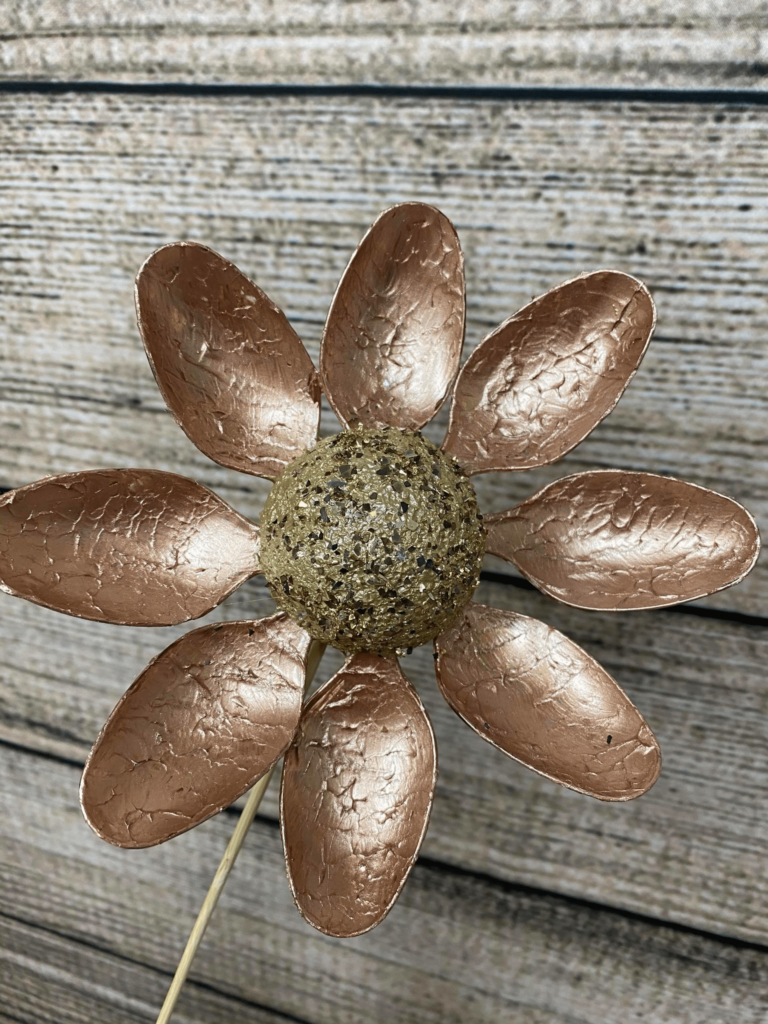
Then, place the floral foam with the spoons into the shallow container filled with water, allowing the spoons to float on the surface. Your delightful floating spoon flowers are now ready to adorn your home with their playful beauty! As Georgia O’Keeffe once said, “I found I could say things with color and shapes that I couldn’t say any other way – things I had no words for.” So let your child’s imagination blossom as they craft their own unique floating spoon flowers!
Conclusion:
Looking for simple yet engaging DIY projects to keep your kids entertained? Explore our top 10 easy DIY ideas, designed to ignite their creativity and provide hours of fun. From crafting colorful paper plate animals to building mini terrariums, there’s something for every young artist and explorer. So, why not roll up your sleeves, gather your supplies, and embark on a creative adventure with your children today? What’s your child’s favorite way to get creative? Share your thoughts and experiences with us! Get started on your DIY journey and watch as your child’s imagination flourishes with each project they tackle.
FAQues
Q1: What are some ideas for Summer Crafts?
A: Seashell Wind Chimes: Create wind chimes using seashells collected from the beach.Sun Prints: Use sunlight to create prints on special sun-sensitive paper or fabric. Watercolor Resist Art: Experiment with watercolors and white crayon or wax resist techniques to create vibrant summer-themed paintings.
Q2: What are the cutest Summer Crafts for kids?
- Popsicle Stick Photo Frames: Decorate popsicle sticks with paint, glitter, and stickers to create frames for summer memories.
- Paper Plate Sun Visors: Use paper plates, markers, and decorations to craft personalized sun visors for sunny days.
- Shell Critters: Transform collected shells into cute creatures with googly eyes, paint, and glue, sparking creativity and beach-themed fun.
Q3: How long does it take to make Summer Crafts?
A: The time it takes to make summer crafts varies based on the complexity and materials used. Simple crafts like paper plate sun visors or popsicle stick photo frames can be completed in 30 minutes to an hour. More intricate projects such as tie-dye creations or detailed paintings may take several hours or spread over multiple sessions.
Q4: How do you make Summer Crafts for kids?
A: Choose age-appropriate crafts: Select projects that match children’s skill levels and interests, ensuring they can participate comfortably. Gather supplies: Collect materials like paper, markers, glue, scissors, and any specific items needed for the chosen craft. Provide guidance and encouragement: Demonstrate steps clearly, encourage creativity and supervise as needed to ensure a safe and enjoyable crafting experience.
Great